

RC Transmitter – Calibration Tutorial
Before your custom RC transmitter is ready for real use, it needs to be calibrated.
This step makes sure your joysticks, switches, and potentiometers are reading correctly and responding the way you expect.
In this tutorial, I’ll walk through the calibration process for the ESP32 + SX1280 setup, including enabling calibration mode, reading values, and updating your configuration.

Before starting and using the remote, you’ll need to calibrate it.
This can be easily achieved by uploading the code and setting the calibration mode.
Code location: https://github.com/alx-uta/RC-Transmitter/tree/main/code/RemoteTx.
Please note that before trying to upload the code you’ll need to create a copy of the file example.user_config.hpp with the name user_config.hpp.
After creating the copy, open the file user_config.hpp and set the ENABLE_CALIBRATION true.
// Debug
#define ENABLE_SERIAL_PRINT     true
#define ENABLE_DEBUG            false
#define ENABLE_RADIO_LIB_DEBUG  false

// Calibration
uint8_t calibrationReadings     = 100;
#define ENABLE_CALIBRATION      true
Once you’ll do that, upload the code, open the serial monitor and set the baud rate at 115200. After restarting the remote, you’ll see the following information in the serial monitor.
....
1: Joysticks Drift & Center Value
2: Left Joystick: MIN Values
3: Left Joystick: MAX Values
4: Right Joystick: MIN Values
5: Right Joystick: MAX Values
6: Potentiometers Calibration
...
1. Joysticks Drift & Center Value
After entering the number 1 and pressing enter, you’ll see a similar result:
Joysticks Drift & Center Value:
Middle Value:
Left Joystick: X: 1887: Y: 1851
Right Joystick: X: 1838: Y: 1965


Drift Values:
Left Joystick: X: 5: Y: 7
Right Joystick: X: 14: Y: 7
Using the above information, update the user_config.hpp.
Joysticks Drift & Center Value:
| Serial Variable Name | Config Variable Name |
|---|---|
| Left Joystick: X | left_joystick_middle_value_x |
| Left Joystick: Y | left_joystick_middle_value_y |
| Right Joystick: X | right_joystick_middle_value_x |
| Right Joystick: Y | right_joystick_middle_value_y |
Drift Values:
| Serial Variable Name | Config Variable Name |
|---|---|
| Left Joystick: X | left_joystick_drift_value_x |
| Left Joystick: Y | left_joystick_drift_value_y |
| Right Joystick: X | right_joystick_drift_value_x |
| Right Joystick: Y | right_joystick_drift_value_y |
Min/Max Calibration
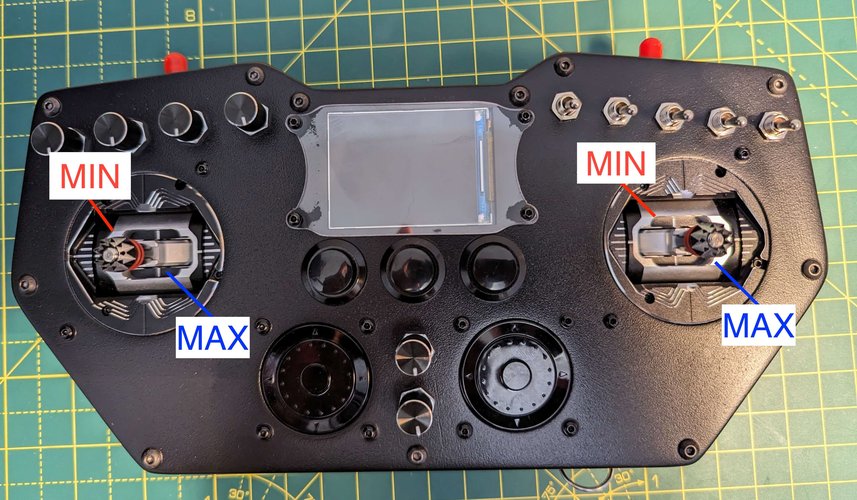
To get the MIN values, you’ll need to keep the joystick in the MIN area and send 2 for the left Joystick and 4 for the right joystick.
Once you’ve done that, you should see something similar to the following in the serial monitor.
Left Joystick: MIN Values:
X: 705: Y: 489
....
Right Joystick: MIN Values:
X: 184: Y: 638
Based on which joystick, you’ll need to update the user_config.hpp
| Joystick | Serial Variable Name | Config Variable Name |
|---|---|---|
| Left Joystick | X | left_joystick_min_value_x |
| Left Joystick | Y | left_joystick_min_value_y |
| Right Joystick | X | right_joystick_min_value_x |
| Right Joystick | Y | right_joystick_min_value_y |
For the MAX values, you’ll need to do something similar. Keep the joystick in the MAX area and send 3 for the left joystick and 5 for the right joystick.
The serial monitor should display something similar to the following:
Left Joystick: MAX Values:
X: 3026: Y: 2962
...
Right Joystick: MAX Values:
X: 3349: Y: 3218
Based on which joystick, you’ll need to update the user_config.hpp
| Joystick | Serial Variable Name | Config Variable Name |
|---|---|---|
| Left Joystick | X | left_joystick_max_value_x |
| Left Joystick | Y | left_joystick_max_value_y |
| Right Joystick | X | right_joystick_max_value_x |
| Right Joystick | Y | right_joystick_max_value_y |
Once you finish with the joysticks' calibration, the final step is the potentiometers.
For this, you’ll need to open all the potentiometers at maximum and send 6 in the serial monitor.
After that, you should see something similar to the following:
Potentiometers Calibration:
Min Value: 3705
This was the minimum value that I was able to read from my potentiometers.
Using this value, update the user_config.hpp and set the pot_max.
Based on your potentiometers and current noise, you could also increase or decrease the drift value. Currently, the default is 2.
Note:
Joysticks: I’ll recommend adding an extra +5 for the min values, while for the max values, extract 5.
Potentiometers: For the max value, I’ll recommend subtracting 2 and keeping the drift value at 2.
2. Debugging
Once you’ve added all the values, disable the calibration and enable the debug.
// Debug
#define ENABLE_SERIAL_PRINT     true
#define ENABLE_DEBUG            true
#define ENABLE_RADIO_LIB_DEBUG  false

// Calibration
uint8_t calibrationReadings     = 100;
#define ENABLE_CALIBRATION      false
3. Potentiometers
You should be able to see values from 0 to 255 for the potentiometers.
4. Joysticks
When moving the joystick in the MIN area, you should be able to see 0 for both X and Y, while after moving the joystick in the MAX area, you should be able to see 255 for both X and Y.
Frequently Asked Questions:
Q: The potentiometer is at the maximum value, but it changes from 255 to a lower value and back to 255
A: This means that you’ll need to increase your drift value from 2 to 3 or 4.
Q: The Joystick is in the middle, and the value drifts from 127 on the X or Y axis.
A: Your drift value is too low for that axis. Increase it by 5 and retest. You could also try to use a drift value of 15.
Q: The joystick is in the MIN area, but I don’t have a stable reading of 0 for X and/or Y.
A: Increase the min value for X and/or Y by 5 and retest.
Q: The joystick is in the MAX are,a but I don’t have a stable reading of 255 for X and/or Y.
A: Decrease the max value for X and/or Y by 5 and retest.